Monday 26 November 2018

Metatrader 101: How to Set Up Push Notifications in Metatrader

Push notifications in Metatrader can be a great tool - you can get alerts to your smart phone on the move and so always be in touch with what's going on. Setting it up is fairly straight-forward - here's how to do it.

1. Firstly you need to be aware of what a push notification is: it's a message which is sent to the Metatrader app on your smart phone. So in order for this to work you need to have a smart phone on which you can install the Metatrader app. Go to the app store and install the Metatrader 4 app in the usual way.

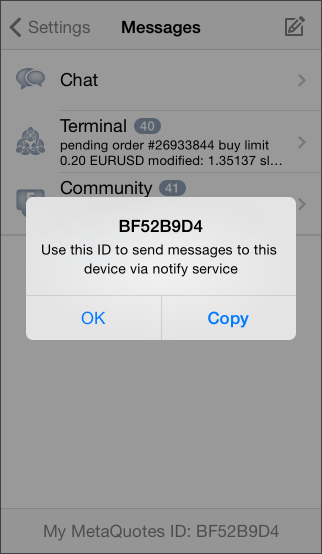
2. Once you have done this you need to get your Metatrader ID. This is a unique ID that identifies your app installation on your phone. You can find it under the settings icon on your app. It's going to be an eight digit/letter code that you need to make note of.


3. Next you need to go to your computer version of Metatrader which is going to be sending out the notifications. Go to the Tools | Options menu option to bring up the Options dialog box. Navigate to the Notifications tab.

4. Click on Enable Push Notifications and then fill in your Metatrader ID from step 2. Click on the Test button to try it out and you should get a message appear almost immediately on your phone.


5. That's basically it! Notifications aren't always immediate as they depend on the network over which they're travelling but they're usually pretty fast.


Metatrader 101: How to Set-up E-mail Alerts on Mt4

E-mail alerts from Metatrader can be a very useful tool. Indeed our own Mt4 Alert Indicators rely on it (and also phone push notifications) for sending information to users when they are away from their desks. But how does one set it up? This post describes the process

1. From within Metatrader select the Tools | Options menu option which will bring up the Options dialog box.

2. There are many tabs on this, select the Email tab and click the Enable tick box at the top in order to activate the various fields.

3. The way that it works is that you need a "relay" e-mail account which is used to send the messages to any other account that you want. By far the easiest way to do this is to set up a new gmail account. So you'll need to have a new gmail e-mail address together with it's password. For the purposes of this article lets assume that it's called relay_address@gmail.com and that you eventually want to send these e-mails on to some destination address destination_address@anything.com. I've put anything.com as part of the destination address to emphasise that it doesn't need to be a gmail address (though of course it can be if you want it to be).

Once you've created this gmail address then fill in the fields below like this:


The SMTP password is the password for your e-mail address. You can see that the SMTP login and the From fields are the same as the alert e-mail is going to come from this relay address and to be sent to your destination_address@anything.com address.

4. Now click on the Test button and look at the Journal tab closely to see what it says.If it says:

Mail: 'Test message' has been sent

or words to that effect then you know that it's all working and you can go and check in your destination e-mail box for your message. You've now finished the set-up and can stop here.

5. If on the other hand you get the message

Mail: login to smtp.gmail.com failed

then (assuming that you've correctly entered your account details in the dialog box) you've got one more step to do. Google have security settings for their accounts which by default restricts access from non-Google accounts so you need to change this setting. Go to your Google Account and you need to find the Apps with account access section (this changes location from time to time so you will need to navigate around until you find it). Switch on the less secure access part.

Once you've done this try your Test message again. You should now find that it all works.

6. That should be it. You shouldn't ever need to access your relay gmail account again if you don't want to and it will faithfully keep forwarding your messages on for you. Now that you've configured all this, any e-mail notifications that your Mt4 indicators or EA's send will correctly work.

Wednesday 12 September 2018

Installing and Using Strategy DLL's in ForexTester

A ForexTester strategy will be supplied to you as a Windows DLL library, so a file with a .dll suffix.

To install:

1. Shut down your copy of ForexTester

2. Find the folder where ForexTester is installed. This is usually something like
C:\ForexTester3\
(or C:\ForexTester2\ if you're running the older version)

3. Find the Strategies sub-folder (so C:\ForexTester3\Strategies for example) and copy the the dll file there.

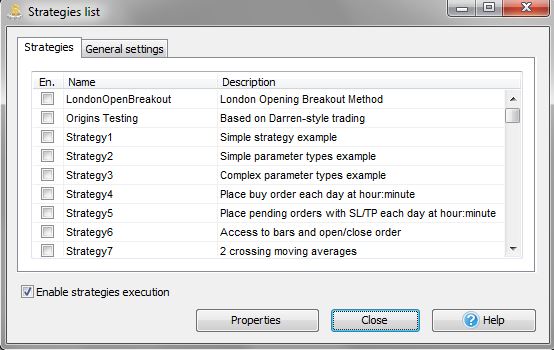
4. Re-start ForexTester and bring up the Strategies List dialog box by using the Testing | Strategies List menu option (note there is also a toolbar button to do this as well).

A typical Strategies List dialog box
5. Look for the strategy that you are choosing to install in the list. If you cannot see it then look on the Journals tab to see if there are any error messages explaining why it can't find or load the DLL.

6. Once you've found the Strategy, click on it to highlight it (it turns yellow) and then click on the Properties button to bring up the Strategy Properties dialog box for your strategy. Different strategies will have different parameters but please note that in general for a ForexTester strategy there will be a Currency Pair and a time-frame input. In order for your strategy to work you MUST ensure that both these inputs match the chart that you are working with otherwise the strategy will not work. Click the Apply button at the end to save your chosen input values and close the dialog box.

7. Back in the Strategies list dialog box, tick the box at the left-hand end of the line that lists your strategy to say that you want to activate your strategy. Please also ensure that the Enable strategies execution box is ticked at the bottom.

Your chosen strategy after activation

8. Your strategy should now be activated and will start working as you play through your data. Please note that you can turn all strategies on and off using the Testing | Enable/disable Strategy Execution menu option or alternatively by using the toobar button. If you want to reset your strategy at anytime then go back to the Strategies List and remove and then re-apply the tick on the left-hand side. This will reset the strategy back to its initial state.

The Strategy Enable/disable toolbar button

Troubleshooting
If you have any problems with any part of this installation then one useful tip is to look at the Journal tab of ForexTester where helpful information is printed out. There you should see any error messages appear when ForexTester tries to load up the dll.


Installing & Using Script DLL's in ForexTester

A ForexTester script will be supplied to you as one or two Windows DLL libraries, so files with a .dll suffix.

To install:

1. Shut down your copy of ForexTester

2. Find the folder where ForexTester is installed. This is usually something like
C:\ForexTester3\
(or C:\ForexTester2\ if you're running the older version)

3. Find the Scripts sub-folder (so C:\ForexTester3\Scripts for example) and copy the two dll files there.

4. Re-start ForexTester and find the Scripts panel. This is usually on a tab next to the Data Window but if you can't find it then go to the View | Show Panels | Scripts menu option, making sure that there's a tick next to it. You should see your script or scripts listed there though you won't initially see anything in the Hotkey section

The Scripts panel
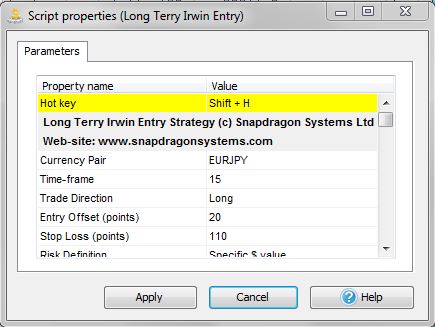
    5. Right click on one of the scripts and select Edit Script Properties. This will bring up the script properties dialog box. Here you can set all the inputs for your script. The first entry in this list will be the Hot key value. Please note that you must set this value to a unique key combination that is not being used by any other script, otherwise it will complain. Please also note that in general for a ForexTester script there will be a Currency Pair and a time-frame input. In order for your script to work you MUST ensure that both these inputs match the chart that you are working with otherwise the script will not work.

    A typical script input selection
    6. You can set the other inputs as required for your particular script.

    Troubleshooting
    If you have any problems with any part of this installation then one useful tip is to look at the Journal tab of ForexTester where helpful information is printed out. There you should see any error messages appear when ForexTester tries to load up the dll.


    To Use:

    When you want to apply the scrip to your chart you can either simply double-click on the script name in the Scripts panel or you can use the unique key combination. This will immediately run the script. Please note that a script is specifically designed to be a "run once" operation. To get it to run again you need to double-click again (or use the key combination again).

    Metatrader 101: Installing a DLL Library to your Mt4 Installation

    This is the one in a series of Metatrader 101 posts, partly so that I can have something to give to clients who are new to Mt4. It will cover the basics so people can get up and running quickly.

    Some more advanced Metatrader code that you'll come across will require a DLL (a Windows library file) to be installed as well as the actual .ex4 or .mq4 file. This is actually just as easy as installing any Metatrader code. Here's how to do it.

    1. A DLL file will have a .dll name tag to it so you'll know that it needs to be treated differently from other Metatrader files.

    2. Unfortunately, the location on your hard drive of your Mt4 software is rather complicated as it's split up into two locations. The bit where you need to copy your new software to is hidden away deep within the AppData section and you won't easily find it by exploring the various folders. To help you with this there is a menu option which will open the location for you. From your Mt4 software go to File | Open Data Folder in order to bring up Windows Explorer opened at the correct folder location.

    The folders within the MQL4 main folder

    3.  You'll see an MQL4 folder which you should open to reveal a series of sub-folders (see image above). Unlike for .mq4 or .ex4 files, DLL's need to go in the Libraries folder so navigate there and drop the file in the folder.

    4. That's basically it! Unlike for .mq4 or .ex4 files there's no need to refresh or restart your Mt4 program explicitly for the DLL though if you've installed some code which uses the DLL then you'll need to refresh or restart for that part. See the instruction on installing new Mt4 code for details on how to install mq4 or .ex4 files.


    Wednesday 25 April 2018

    Importing Back-test Data in Metatrader4

    Back-testing with Metatrader4 can be a bit tricky for the unwary as there are some quirks that you need to be aware of and if you're not careful you can end up back-testing with random data rather than the good quality data that you thought you were. In this blog post I go through how to ensure that your back-test is what you think it is. I also walk you through the necessary steps for importing and converting your data to different time-frames. This is particularly relevant if you want to use good quality back-test data of your own and are worried about it being "contaminated" by data from other sources. Incidentally, you may wish to take a look at the Snapdragon Historic Data Service as a good source of clean historic data for back-testing.

    Part 1 - Clearing Out Old History Data
    The first thing to be aware of is that the data that is used in the Mt4 back-test is stored in the history folder. You can look at this folder by going to the File | Open Data Folder menu option which will bring up the Windows Explorer open at the root folder for your installation. If you then open the history folder and select your broker folder you will be able to see all the history files which will have names like EURUSD1.hst. These are the same files that you can see when you select the  File | Open offline menu option instead, but in that instance they are all listed in a dialog box and you can't delete them. So that's where the data is stored. What you also need to know is that when Mt4 closes down, it writes out all the history data to this folder. So if you want to clear all your history data for example then you need to do it in the following way:

    1. Open up the folder in Windows Explorer by going to File | Open Data Folder
    2. Now close down Mt4 (but leave Windows Explorer open)
    3. Now to delete all the data for EURUSD say, navigate down to the appropriate files and delete all the EURUSD*.hst files.

    If you're importing your own data for a back-test then I recommend that you first clear out the old data using this method.

    Part 2 - Importing Your Own Data
    To import some data of your own into the history folder then this is done using the History Center dialog box, which is brought up using the Tools | History Center menu option (or just the F2 key). Once you bring up this dialog box you will see something like this 


    You can see down the left-hand side are listed all the markets and by drilling down into them you can see sub-folders for each of the available time-frames. One important thing to note is that in order to select one of these sub-folders you need to double-click on it - just selecting it is not enough. If you look in the title bar of the dialog box it shows you which folder is currently active.

    A really important fact to note is that when you double-click on a folder Mt4 "helpfully" goes and populates it with some data of its own. So even after you've deleted all the history data for a pair as described in Part 1 it will still go and put some more in that it's downloaded from its servers. The best way around this issue is to double-click on the M1 folder, let it populate the list with its own data and then to delete it again. To do this, highlight the top element, hold down the shift key and then scroll to the bottom and click on the last element. This should now highlight all the elements in the list. Now click on the Delete button to delete them all. This deletes all the entries in the list. 

    The next thing to do is to import your own data. You do this by clicking the Import button and then navigating to the file that you want to import. Once you've imported your own data, Mt4 won't overwrite it, but it will still add stuff beyond the end of your data. There's not a lot you can do about this but as long as you know what date your data goes up to and are careful only to test up to that point then it should be OK. You should now have your own imported data in the list.

    You should now see your data in the dialog box. Finally to make sure that it's saved to the history folder you should close down Mt4.


    Part 3 - Populating Different Time-frames
    Now, when running back-tests, the Strategy Tester sometimes pulls in data from different time-frames in order to construct the bar data that you are back-testing. The best way to ensure that you are only using your own data is to populate all the time-frames with your own data. Even if you're only back-testing one time-frame it is still recommended that you populate all the others just to be on the safe side. Now you may only have 1 minute data so you how do you create M5, M15 etc from this? The answer is to use the Period Converter script. Below are the necessary steps for doing this

    1. The first thing that you need to do is to change the Max bars in history and Max bars in chart options in your Mt4 to ensure that you can load in all your data without any problems. Go to Tools | Options and then select the Charts tab from the dialog box. Set the Max bars in history and the Max bars in chart options to as big a number as you can fit in there: I just keep putting 9's in there until it won't take any more.


    2. Next you need to go to the  File | Open offline menu option which will bring up the dialog box showing all the history data. You should see the file for the symbol that you've imported already, so your EURUSD,M1 file for example. Select this and click on the Open button. This will bring up a chart and because of your Max bars settings it will load all that it can into the chart.

    3. Next we will need to generate the other time-frames. To do this we can use the Period Converter script that comes with your Mt4 installation. Drop the script into the chart and set the Period multiplier factor to 5 first of all to generate the 5 minute data. Note that you won't see anything happen on the chart but in the Experts tab it will say X records written.

    4. Now repeat this process for all the time-frames that you are likely to need, so 15, 30, 60, 240 etc. I usually don't bother with the daily if I'm not testing a daily strategy but will do all the intraday time-frames.

    5. Once you've done this then if you bring up the Offline Chart dialog (File | Open offline) then you should see all the different time-frames now listed there.

    6. Finally, remember to set your two Max bars settings back to something moderate, otherwise it will slow your Mt4 right down.

    7. The last step is to close down Mt4. This will write out all the history data to the folder so it's now backed up.

    Part 4 - Using Your Data
    That should be it! You have now created all the history data that you want populated with your own data source and you can go ahead and do your back-tests with the Strategy Tester. Just make sure that you specify the end date from the test so it stops at or before your own data does. Otherwise you'll be using some data that Mt4 has provided.
    Thursday 19 April 2018

    Snapdragon Systems Historic Data Service

    Clean financial market data for back-testing
    Through our various trading platforms and data feeds we have accumulated a reasonable history of finanical market data over the years. What we have now done is to clean it up (where possible it's from a single reliable and tradeable source), and convert it into a format that can easily be imported either into ForexTester or into Metatrader4 for back-testing. Below are the key points of the service

    • Spot forex: all pair combinations from the 8 major markets + some key CFD markets as well
    •  Goes back to the start of 2006 in 1 minute bars
    •  Comes in Ascii format for easy importing across a variety of platforms.
    • Will load straight into the ForexTester back-testing platform and also into the Metatrader4 History Center for Strategy Tester back-tests

    Data is adjusted for the daylight savings difference between the US and Europe so you can either have the New York close always at the same time or the London Open always at the same time. Both sets of data are supplied.

    •     Price is GBP 100.00 to download all the data along with weekly updates for one month.
    •    Thereafter you can get weekly updates for GBP 60.00 per quarter. NB this is optional, so if you just want a one-off data dump then simply don't renew your subscription at the end of the first month.


    For more enquiries or to order please get in touch via the Snapdragon Systems contact page on our web-site

    We can also source other markets and time-frames. If you have a particular requirement that isn't covered by the Historic Data Service then please ask.


    Full List of Markets Convered

    Currencies
    AUD_CAD
    AUD_CHF
    AUD_JPY
    AUD_NZD
    AUD_USD
    CAD_CHF
    CAD_JPY
    CHF_JPY
    EUR_AUD
    EUR_CAD
    EUR_CHF
    EUR_GBP
    EUR_JPY
    EUR_NZD
    EUR_USD
    GBP_AUD
    GBP_CAD
    GBP_CHF
    GBP_JPY
    GBP_NZD
    GBP_USD
    NZD_CAD
    NZD_CHF
    NZD_JPY
    NZD_USD
    USD_CAD
    USD_CHF
    USD_JPY

    CFDs
    DAX30
    S&P500
    NASDAQ100
    CORN
    COPPER
    NATGAS
    PALLADIUM
    PLATINUM
    SILVER
    GOLD
    SOYBEANS
    WHEAT
    WTI CRUDE OIL